Self-Paced Learning: How One Teacher Does It
Listen to my interview with Natalie McCutchen (transcript)
With few exceptions, I would bet that most teachers feel they could be doing a better job of differentiating instruction. It’s not that we don’t want to do it—we know our students learn at different rates, that some need more help and others could be moving much more quickly than we let them. The problem for many of us is that we just can’t figure out how to manage it. How do you run a classroom where each student is working on a different thing at a different speed?
The first time I ever saw a truly self-paced learning environment was on my visit to a Montessori Elementary School two years ago. And although I was completely enchanted by the student-centered environment there, the class size was small. I wondered whether that method could really be scaled up to class sizes at a typical public school.
So I was excited when, at a recent TeachMeet, I saw that there would be a session on self-paced learning. At the session, Franklin, KY, middle school math teacher Natalie McCutchen showed us how she has converted her pre-algebra class to a completely self-paced system, where students work on different skills at their own pace, and how she’s gradually introducing self-paced learning in her other math classes as well. I found her system to be astonishingly simple, and I thought a lot of other teachers might like to try it for themselves, so I interviewed her for my latest podcast episode (see player below) and asked if I could share her methods here.
How Self-Paced Learning Works in Natalie’s Class

Here’s a quick snapshot of how she does it: For each chapter in their math textbook, students take a pre-test to determine which skills they have already mastered and which ones they still need to learn. For the skills they still need to master, they work independently on lessons (either reading them in the textbook or watching them on videos) and do practice problems until they feel they’ve got the skill down. This is the true self-paced part: Students decide how many lessons they need. They decide how much practice to give themselves. “Maybe there are five videos that you could watch today,” Natalie explains to her students. “You watch as many as you need. If you watch two videos and you understand it, then you move on to the practice. If you need all five, use all five.” Rather than forcing students to follow the same path in lockstep with one another, practicing page after page of skills they already have down, this system gives them a chance to build the metacognitive muscle they’ll need to become lifelong learners.
When a student feels he is ready, he takes a mini-assessment for a single learning target, usually made up of just a few questions. If he does well on that small assessment, he can move on to another skill. Once he has mastered all the skills in the chapter, he takes a whole-chapter assessment—this is the same test he was given as the pre-assessment. If he does well on that, he’s ready to progress to the next chapter.
Q&A on Self-Paced Learning
How do students know which lessons and practices to work on, and when?
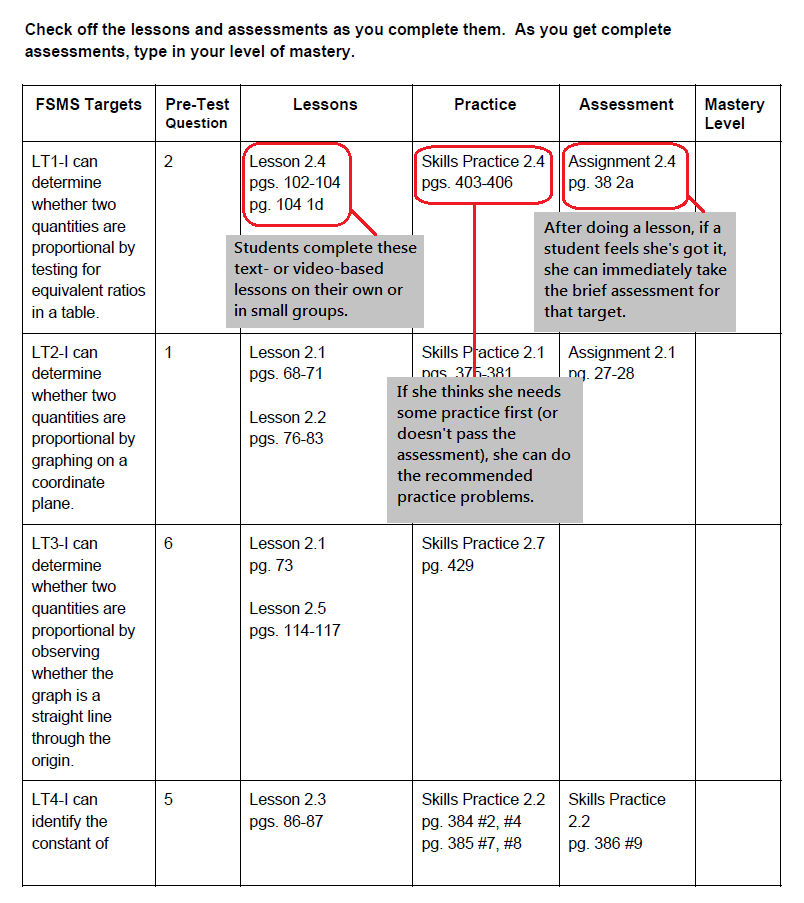
Natalie creates a Chapter Guide for each chapter. It includes each learning target, the pre-test question or questions that align with that target, the lessons students should watch or read to learn about that target, the practice problems that match up with that target, and the assessment question or questions for that target.
Look at the example below. If this student missed question 2 on the pre-test, she should do Lesson 2.4 on pages 102-104 and may need to do Skills Practice 2.4 on pages 403-406 in preparation for the assessment for that learning target, which is item 2a on page 38. She might only need to read through the lesson and do one or two practice problems in order to do well on the assessment, or she might choose to do them all. Likewise, if she got question 6 correct on the pre-test, she doesn’t need to do the lesson, the practice, or the assessment for that learning target at all—she’d just mark that as mastered on the chart.
Do students get the answer keys?
Students have access to the answers for all of the practice questions, so Natalie does not need to check these; it’s up to the student to do the practice problems, then self-check them to see if they’re getting the skill down. There’s no real incentive to cheat here, because if a student doesn’t teach herself the skill, it will show up in the mini-assessment for that target: The mini-assessment IS scored by the teacher, and students are not given an answer key for it.
What does class time look like?
“It’s very much organized chaos,” Natalie says. “They keep the chapter guide in a composition notebook. We glue all their items in there. So they have that with them on their desk every day, and I’m able to go by and say Okay, what have you done? Where are you today? And at the end of class, I can say, How much did you get done?” Because students are all working independently, the amount of work produced on any given day can vary. “Some kids may turn in two assessments per class period, depending on how hard they worked. Some kids may turn in one. Some kids, maybe they didn’t get to an assessment that day.” And because Natalie encourages collaboration between students, the room is busy: “I really prefer them to work together on the lesson, especially with my pre-algebra students, because they are such good math thinkers, they understand and can talk math, I want them to work together. You know, two or three in a group seeing if you can figure it out on your own using the video.”
What if some kids can’t handle all that independence? What if they just fool around the whole time?
Natalie’s solution to this problem was what really impressed me about her system: Not all students get to do self-paced; some have to work with her in a more traditional teacher-led setup. Self-paced learning is a privilege reserved only for kids who take it seriously and work hard. If you mess that up, you can lose the privilege, returning to a group that’s working directly with the teacher. “Sometimes they have to come back to the pack,” she explains. “I’ll say You know what, you really didn’t work that hard yesterday. I’m not even sure what you got done, I don’t see anything on here. Just come back with us today.” For some students, this is a step backward, but they get other chances to move ahead later. “They like being ahead. You know, they think it’s kinda cool. Sometimes I’ll let them go out in the hallway, sit at a little table. They like that, but I stress to them you still have to work.”
Self-Paced Learning: A Step-by-Step Guide
Natalie McCutchen developed her system through some trial and error, and she’s constantly refining it, so none of this is set in stone. But if you’d like to try and replicate her approach to self-paced learning, here are the steps to take:
Step 1: Select a Unit of Content
This can be a chapter in a textbook or a batch of skills or content you would typically teach as a unit over a couple of weeks. This unit should have clearly defined learning targets, which are likely dictated by whatever standards your school follows. If you’ve been teaching for a while, you probably already have this step taken care of. In Natalie’s class, each chapter in her math textbook represents one unit.
Step 2: Create the Assessment
Decide what students should be able to do by the end of the unit and create an assessment that measures it. The simplest type is a test with clearly identified right and wrong answers, where each item (or small group of items) in this assessment is aligned with one learning target. For skills that require more teacher interpretation to measure, like writing, the assessment could be a writing task, such as an extended response question with a prompt and a rubric. Each skill listed in the rubric would align with a specific learning target.
Step 3: Create the Chapter Guide
Following the model shown above, set up a guide that shows which assessment question aligns with each learning target, then lists book or video lessons students can follow to learn each skill, exercises that will give students independent practice with the skill, and a brief assessment students can take to test their mastery.
Step 4: Give the Pre-Test
Use the assessment you created in Step 2 to pre-test students on the skills for this unit. Use the results to identify which learning targets each student has already mastered, and which ones they still need to learn. [Note: Natalie’s school uses standards-based grading, but that’s not a strict requirement for this system. You could still record mastery of learning targets in the standards-based style and convert those measurements to traditional grades. To learn how, see Matt Townsley’s video on converting standards-based indicators to letter grades.]
Step 5: Help Students Identify Standards to Master
Giving each student a Chapter Guide, have them mark which standards they have already mastered—based on pre-test results—and which ones they still need to learn.
Step 6: Provide Time, Materials, and Supervision for Self-Paced Learning
From this point on, students will begin the process of moving through the lessons on their own. Your job is to make sure they have the materials they need to do the work: If you are sending students to videos, make sure they have devices to access them (and earbuds to keep the audio to themselves). Make sure students know where to look for answer keys, and where they can access the mini-assessment when they are ready to take it. Check in with students regularly to make sure they are making good use of their time.
Step 7: Iterate
Keep in mind that this system probably won’t work perfectly the first time you try it. You may want to try it just once with a short unit, rather than attempt to convert your whole year to self-paced learning. You might want to offer it only to students who have the academic skills and maturity to handle it. You may need to tweak it, then tweak it some more. But speaking for the kids who would love a chance to see just how fast they can learn and how far they can go, I’d say it’s worth a serious try. ♦
Other Resources:
- Natalie’s Parent Information Flyer on the Self-Paced Learning System
- Her Parent Information Flyer on Standards-Based Grading
Join my mailing list and get weekly tips, tools, and inspiration — in quick, bite-sized packages — all geared toward making your teaching more effective and fun. To thank you, I’ll send you a free copy of my e-booklet, 20 Ways to Cut Your Grading Time in Half. I look forward to getting to know you better!