Listen to the interview with Andrea Castellano and Irene Yannascoli:
Sponsored by Listenwise and Studyo
“Make your paper dirty.”
I get some funny looks when I say it at first, but it gets the point across. What I mean is I’m looking for annotations. I teach third grade, when young readers typically transition from developing readers to fluent ones, and it’s at this stage that they’re ready to begin to analyze texts on a deeper level. For that reason, this is the perfect time to introduce them to annotation.
Annotation — marking up and making notes on a text — can be an extremely effective tool for improving comprehension and increasing levels of criticality and engagement. By making these metacognitive markings, students are able to process a variety of texts in unique and meaningful ways. The thing is, it can vary in effectiveness, depending on which classroom you look into, if it’s being taught at all. You may have personally found that you aren’t getting the results you want from your approach.
After some trial and error, I have developed my own method for teaching annotation, which I’ll share here, along with the process my colleague Irene Yannascoli uses at the high school level. Whether you teach ELA or another content area, chances are your students read in your class. And if they read, there’s a chance they might need to annotate. Hopefully this post can offer some strategies to help your students establish annotation as part of their regular reading practice.
Elementary Process
Prescriptive vs. Responsive Annotation
One major hurdle students face is deciding what to annotate. Some students are hesitant to mark anything at all while others underline or highlight nearly every sentence in the text. Some teachers have attempted to remedy this by taking a prescriptive approach to annotation. They direct students to locate specific details and what to do when they’ve found them, saying things like, “find and underline the sentence that proves the character is sad,” or “box two words you don’t know in paragraph 2.” It’s like a scavenger hunt: Find three things, answer three questions.
I’ve used this approach in the past, and it certainly is a great way to get students to notice and name things, but what I kept noticing is that whenever I stopped prompting students to make their annotations, they stopped making them. They were so dependent on my guidance that they never took ownership of the process.
Eventually I realized I needed to teach my students to develop their own systems for annotating. The responsive approach I’m advocating here centers the reader on the basis that we all bring our own perspectives, experiences, and ideas to the text. As much as our interpretations are varied and nuanced, so are our annotations. Teaching students to navigate text as active readers helps them make sense of what they read. Artful annotation is what happens when they’re inspired to respond in their own unique way.
Getting Started
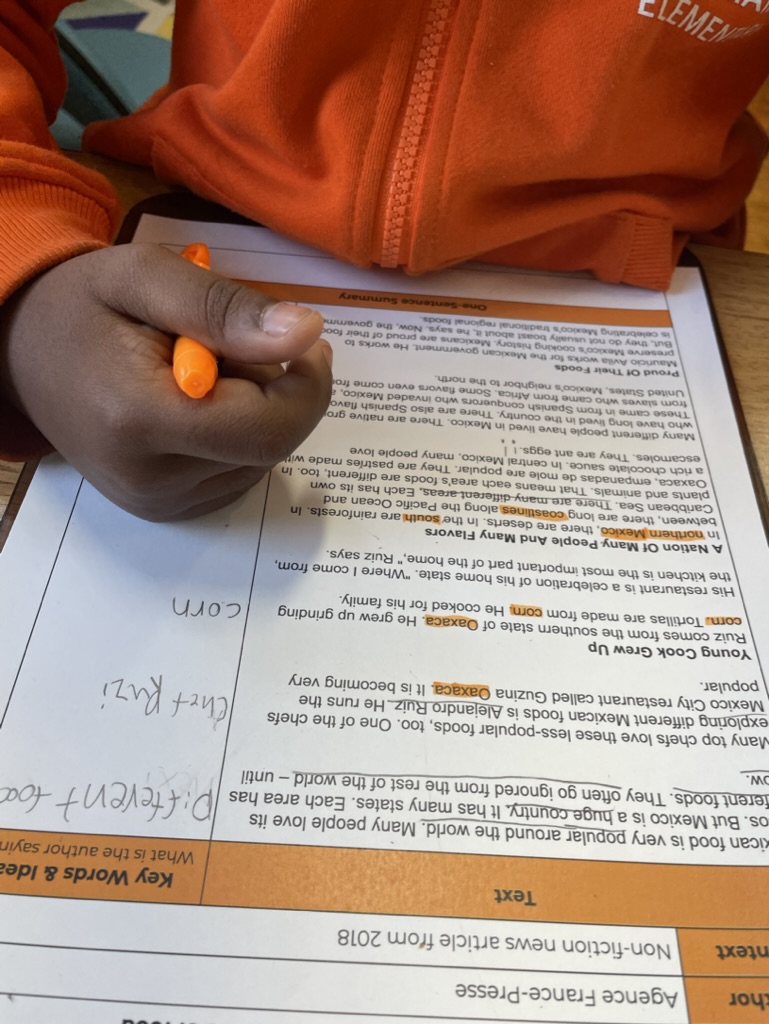
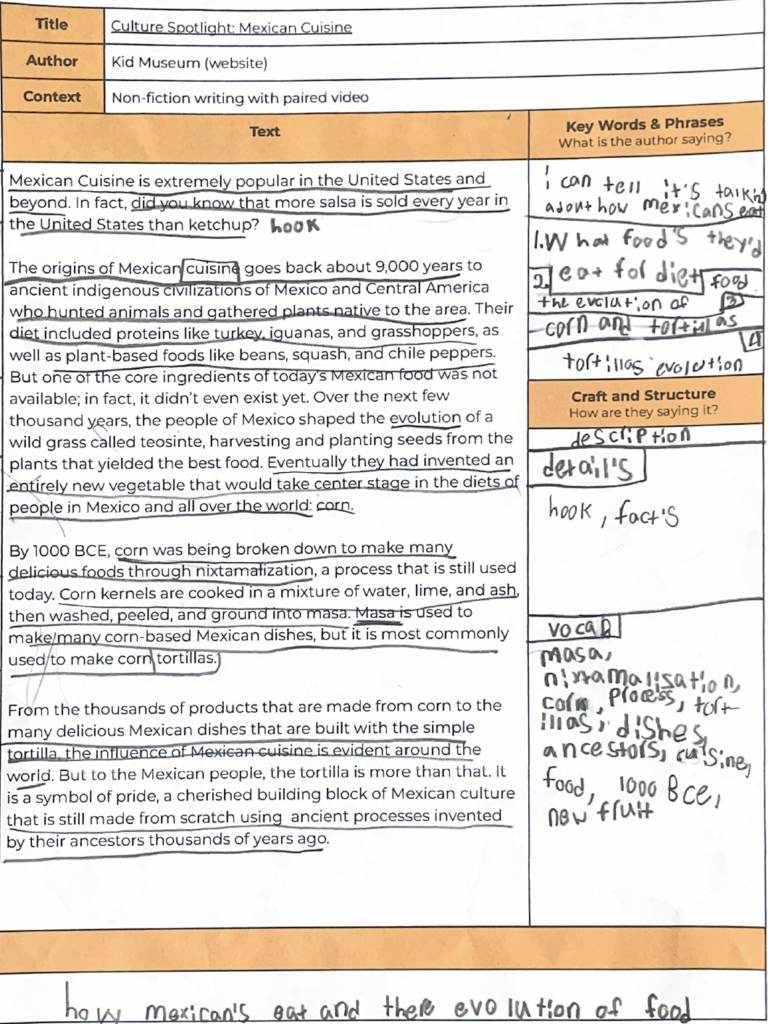
One thing teaching has taught me is that straightforward visuals reduce cognitive load and allow students to concentrate on what’s important. To simplify annotation for my students, I designed a template (below) with space on the left for me to paste the text and cells on the right and bottom for note-taking.
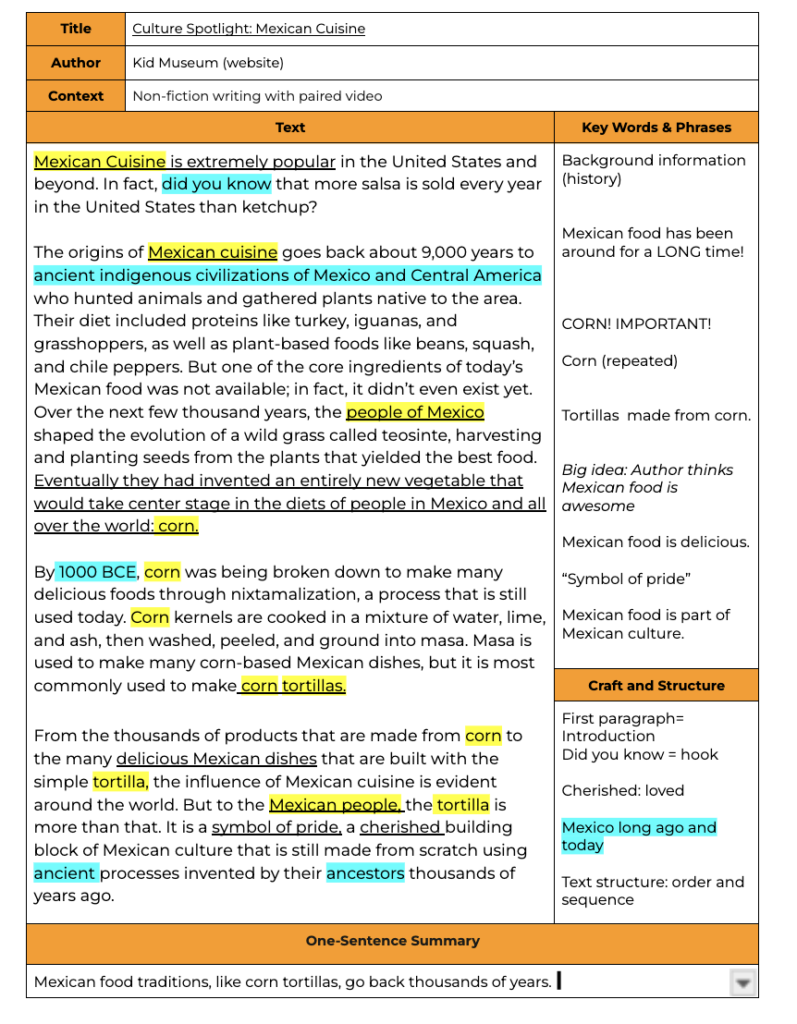
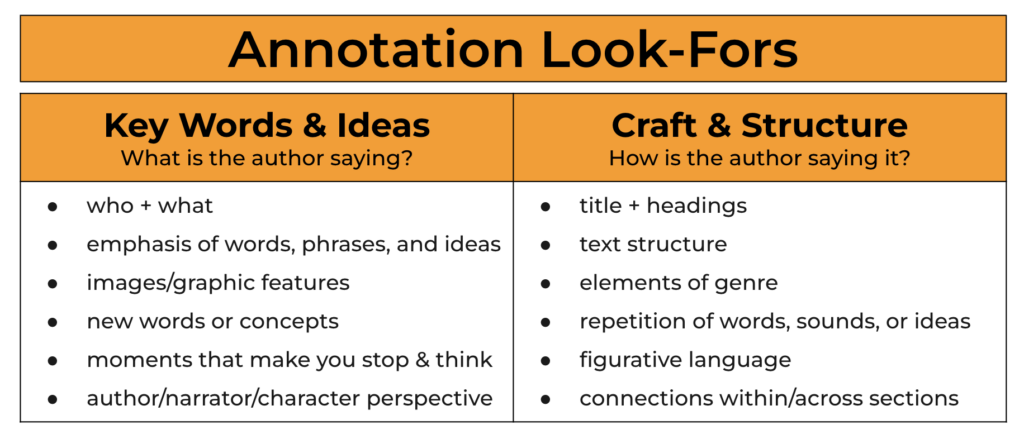
At the point in the year that we start this process, I’ve already taught all the literacy concepts they’ll need for this activity, such as theme, figurative language, text structures, and more. What this template does is sort each concept into one of two lenses: key words & ideas, and craft & structure. We then comb through the text with these two in mind, asking and answering over and over, What is the author saying? and How are they saying it? To remind them of what to look for, I provide the following graphic on the template. This is a list of look-fors that encompass most of what they’ll encounter as they read.
Modeling Responsive Annotation
To introduce responsive annotation, I use a direct approach to make my thinking as transparent as possible. In addition to modeling the use of metacognitive markers, I talk through each step of the process. Here’s a sample breakdown of what that would look like in the early stages.
Introducing Each Lens
- Choose the lens through which you will be approaching the text. In the introductory stage, it is recommended to read the same text twice — one session for key words and ideas, another for craft and structure. Provide the annotation look-fors as an anchor chart or include it on the template itself.
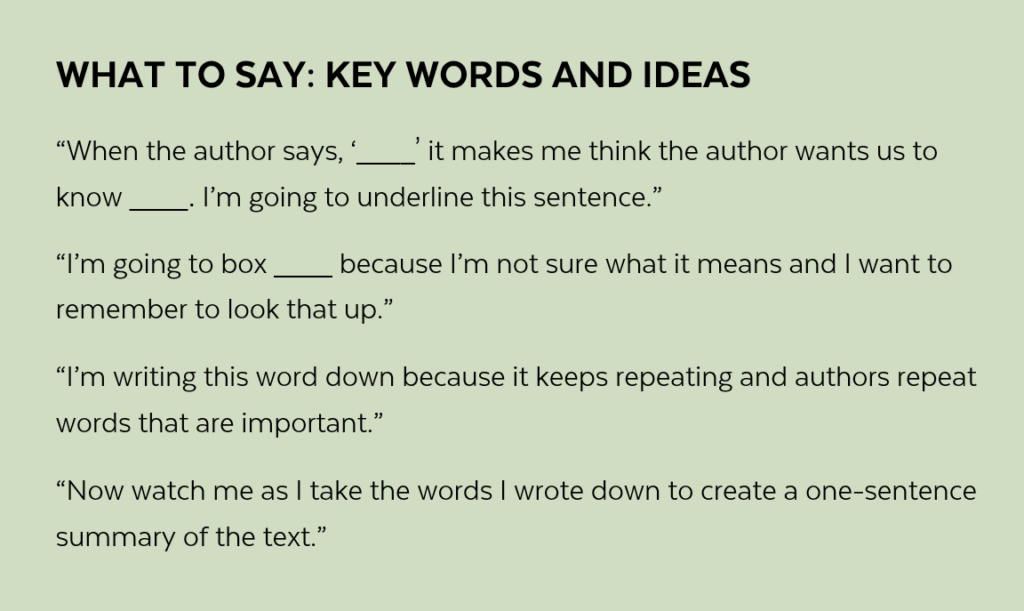
- Give students a copy of the text and display your copy of the text for all to see. As students watch, read a section of text aloud, stopping to underline, box, and make notations.
- Think aloud as you annotate. Read, stop, jot, explain. You are responding to the text as you encounter each element rather than searching the text for specific items. Students should either be watching or copying the teacher’s moves at this stage.
Guided Annotation (Whole Class)
To help students learn to prioritize information, the teacher will pose questions that reinforce the points made in the explicit model. This will happen in lockstep as a whole class — independent practice comes later. This stage works best directly following the teacher model so students get to immediately put things into practice.
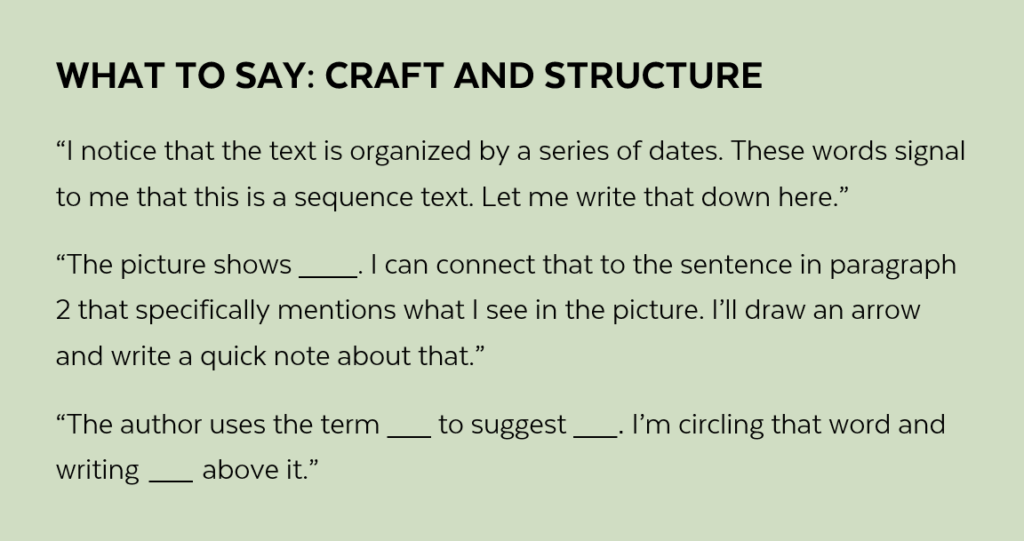
- Guide students through the next section of the text, first by reading it together and then by asking open-ended questions related to the chosen lens. For example:
For Key Words and Ideas:
What is the author saying here?
What words seem important?
What part made you stop and think?
For Craft and Structure:
How does the author show you what the character is feeling in paragraph 5?
Who can find and annotate a connection between paragraph 3 and paragraph 4?
What does the author mean by _____?
- Students take a turn with another section of the text. Prompt students to share their thinking and show what they did. This is a great opportunity to validate or course-correct as needed.
Guided Annotation (Individual)
- When they’re ready for the next stage, provide each student with a new text. Give several minutes to read and annotate, one section at a time. Circulate the room, monitoring and offering feedback. As students make their way through each section, give the green light to move on.
Giving feedback in real time adds encouragement and reinforces desired reading behaviors. This type of gradual release model works best when the teacher is responsive to the needs of the class, moving on only when they’re ready.
- Once they have the hang of it, students continue to read and annotate on their own. Those who need support can now be pulled into a small group. This is also a good time to implement partner annotation for students who may not be ready to read the text independently.
Continue to use the template to support students as they annotate for either key words and ideas or craft and structure. It can be modified to merge the lenses once they can do both with confidence. After several guided annotation lessons, students should be ready to annotate on their own without needing the scaffolding of this stage every time.
Discussion and Feedback
Now that students have a sense of what to look for when they read, what they need at this juncture is a chance to see what other readers are doing and compare it to their own work. This not only deepens their understanding of the text through discussion, it strengthens their grasp on what they should be noticing.
- Gather the class and project student work (in my class, students volunteer to share). Prompt students to compare annotations, note their peers’ insights, and offer feedback.
- Allow students to “borrow” snippets of each others’ annotations if they wish. This is intentionally a collaborative process that promotes the sharing of insights and ideas.
- Students can use the template as long as it’s needed. The cycle of discussion and feedback can continue indefinitely. At any point, the annotation look-fors can be edited for specific genres, content areas, or other purposes for reading.
Click here to make a copy of the elementary process for your Google Drive.


High School Process: Collaborative Annotation
Whether at the secondary or elementary level (click here to jump up to elementary), the art of annotation is in making it meaningful. Responsive annotation does just this. Because students often believe there’s a “right answer” when annotating, asking them what they notice trains them to use their own funds of knowledge as they read. Like my approach to teaching annotation in elementary, Irene Yannascoli gives her 10th graders the freedom to interact with texts on their own terms, deciding for themselves what is meaningful enough to annotate. She also wants them to use peer insight to practice concepts already reviewed in class, so she makes this annotation process collaborative.
Similar to the elementary approach in the previous section, this process has students consider the text through a given lens; in this case, four core concepts that have already been taught in class: identify (notice and name), analyze (explain and connect), evaluate (judge and discuss impact), and synthesize (put it all together). The purpose of the group annotation is to practice these skills collaboratively.
Introducing Each Lens
In order to set this up:
- Choose 4 teaching points from your recent curriculum that you would like students to discuss and practice
- Choose a passage that reflects the 4 teaching points.
- For each of the teaching points, create guiding questions for students to reference while they annotate. It’s not necessary for students to answer all of these guiding questions, and as they get used to the protocol they may use them less and less.
Irene’s guiding questions are pictured below.
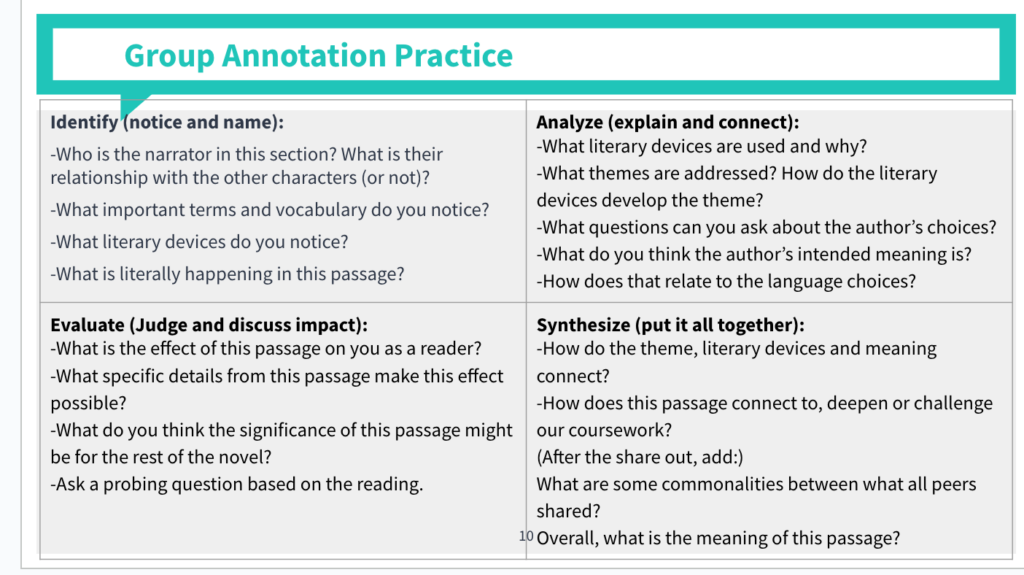
Note that these concepts and questions are specific to language arts study; they can be modified according to any subject or genre.
Independent Annotation
- Start by reviewing the “Group Annotation Practice Protocol” slide (below) with the class.
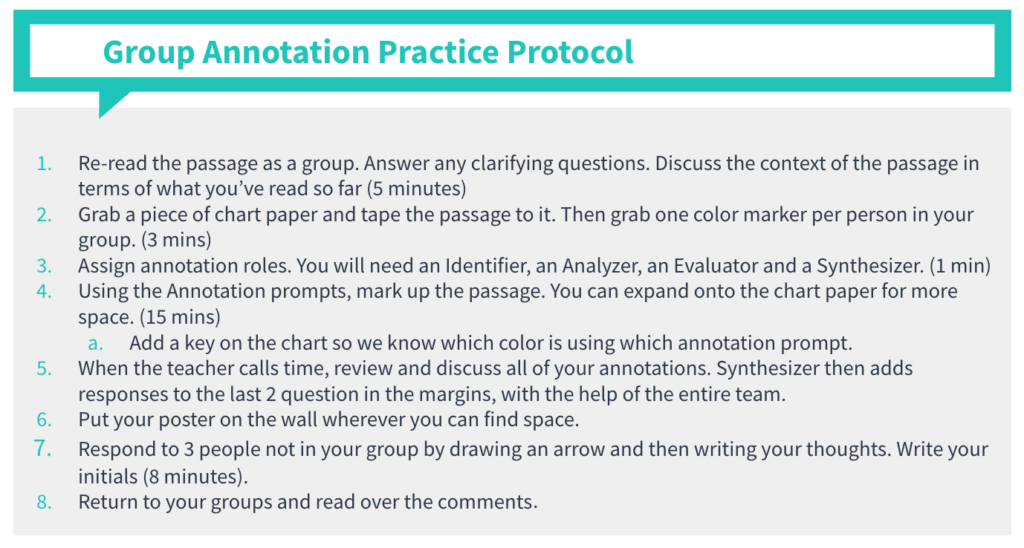
- Conduct a read-aloud of the passage. Ask students if they have any questions before they begin. To assess understanding, you may ask them to identify key terms in the passage or answer questions related to the who, what, when, where and why of the passage
- Students re-read the passage independently and jot down their first thoughts.
This is a preliminary step before they annotate to capture a first impression of the passage, and makes space for any clarifying questions that might arise.
Group Annotation
After students have reread the text on their own, it is time to begin their annotations.
- Students get in groups and each person claims a focus skill: Identify, Analyze, Evaluate or Synthesize. Now, each group member is following one of the 4 sets of guiding questions using the same passage.
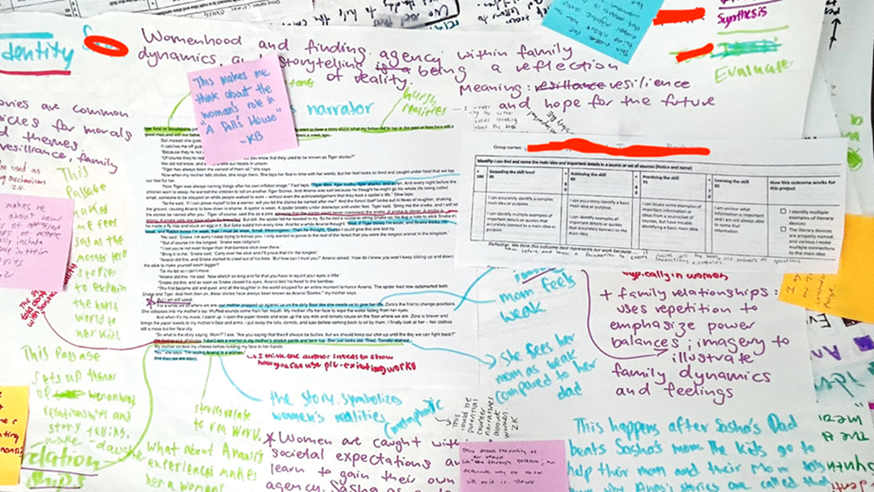
- After taping a copy of the text to chart paper, each student grabs a marker and for 15 minutes, uses the guiding questions to “make their posters dirty.” Each student should be huddled around their chart paper, underlining, drawing arrows, and making notes next to the passage.
- Circulate and observe each group, helping students deepen their thinking by asking questions and making connections between the annotations.
Discussion and Feedback
- Students wrap up and review their annotations. Each person shares their thoughts and epiphanies from the annotation process.
- While the group shares out, the “Synthesizers” answer their last two questions about the commonalities between peers and overall meaning of the passage. They write this on their posters.
- Students then post their chart paper on the wall and conduct a gallery walk, during which they examine peer charts and make notes on post-its expanding, deepening or challenging the original annotations based on their own reading of the text.
Some sentence starters to move students beyond agree/disagree:
This makes me think about…
I can connect this to…
Additionally, this could mean…
I wonder why…
- Students return to their original posters and read what other group members commented. They now have an opportunity to add any final notes, ideas or understandings. If time allows, conduct a whole group share-out: What was something that surprised you, inspired you, or made you rethink?
Assessment
At this point, it’s up to you how to assess students for this activity. You might just treat it as a practice for building independent annotation skills and assess students individually on their own annotations on a future passage. You might choose to develop a rubric for this activity and give all group members a score on their poster. Or you might have students write a reflection about their strengths and weaknesses in the process and set goals for the future.
Click here to make a copy of the high school process for your Google Drive.
A Few Caveats
Although I explicitly model responsive annotation, I don’t expect my students to copy my exact style. Yes, I do tell them to mark up the text as well as make notes in the margins, but I want my students to use metacognitive markers in ways that make sense to them. Some like to underline sentences, others highlight. I circle vocabulary words, others box them. Some enjoy creating their own symbols and methods of organizing their notes in the margins. Recently I’ve noticed a few students creating systems for highlighting in different colors complete with a key.
It must also be said that not every student needs to or should annotate when they read. Some process text better internally and find the annotation system slows them down or distracts them; others can’t handle the multitasking element and just need to focus on reading. The supports provided for accessing the text are just a temporary scaffold anyway. As long as they can demonstrate that they understand what they’re reading in other ways, (e.g., through discussion or answering questions) I really don’t insist that they do it. But for the majority of students who find themselves glossing over key moments or struggling with comprehension, this process is extremely useful. Ultimately, the decision depends on you knowing your students and what works for them as learners.
So, Is This Really Worth It?
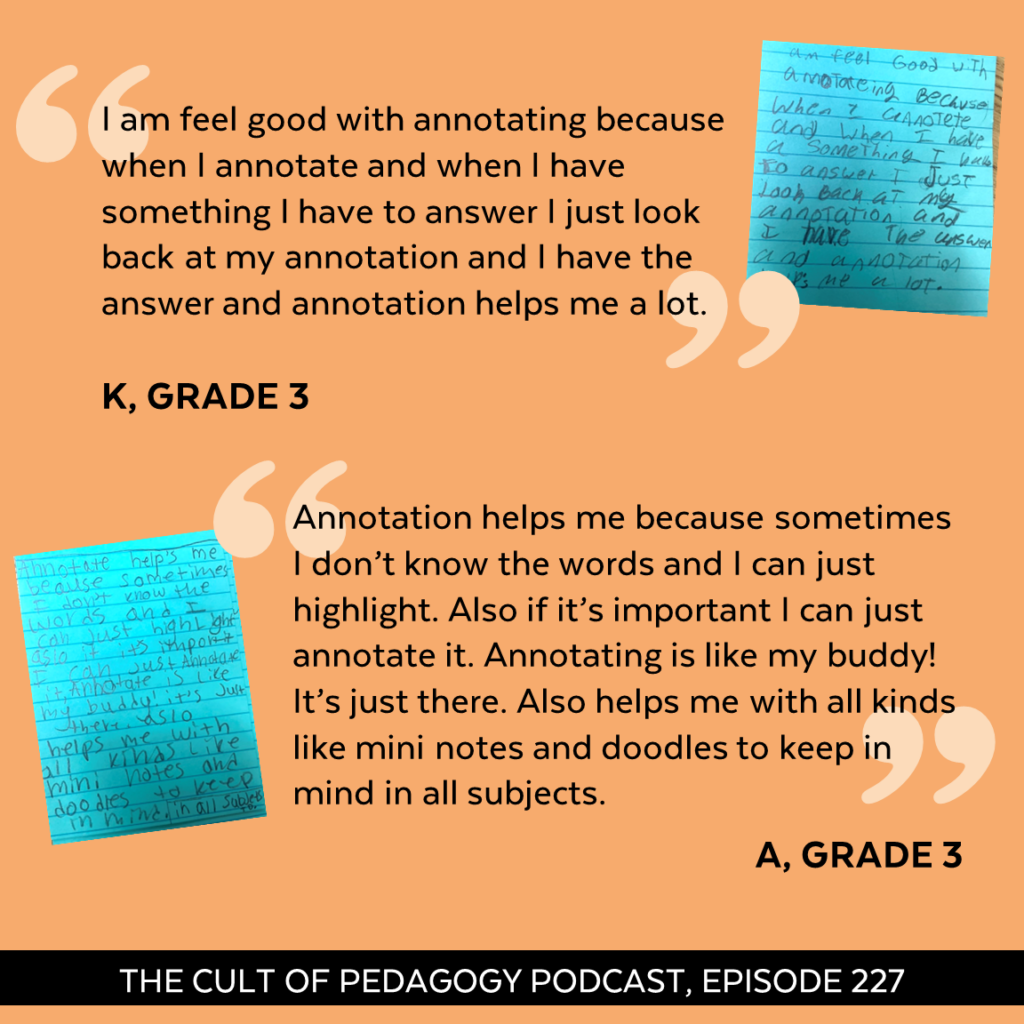
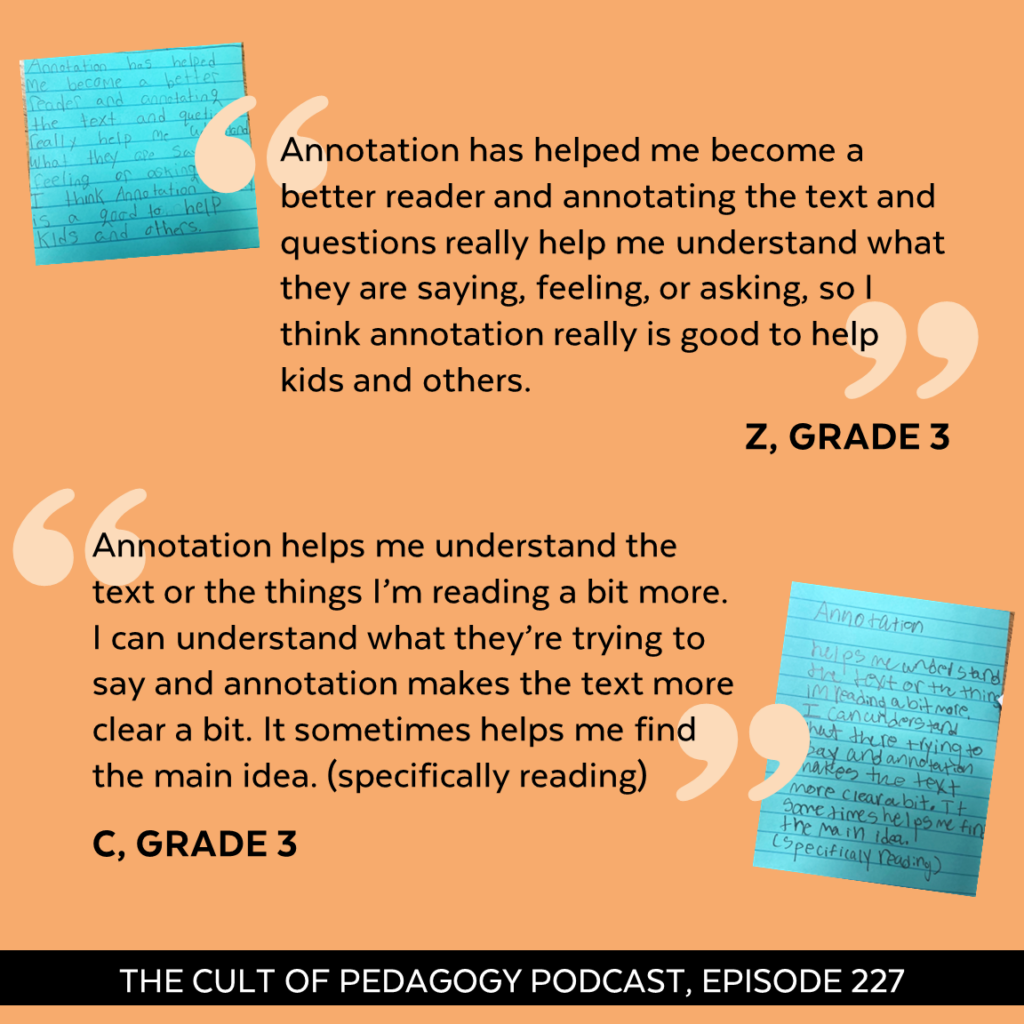
Since we’ve been teaching annotation this way, Irene and I have both observed a correlation between the quality of annotations on the page and the ability to comprehend text. Incorporating the look-fors into the annotation practice reinforces the concepts skills taught across the year. And the confidence our students have in themselves as readers has also grown. My students say things like, “Annotation has helped me become a better reader“ and “Annotation helps me understand the text or the things I’m reading a bit more.”
This process is about more than preparing students for standardized tests or giving them a strategy to boost their grades. Our students will be reading and comprehending texts for a very long time — hopefully, for the rest of their lives. While they won’t always grab a pen when they sit down with a book, there will be many times they can put these skills to work. If the goal is to process what they’re reading, annotation provides them with one way to do so.
Annotating, or “making your paper dirty” as we like to call it, is definitely an acquired skill. It takes time to learn, but more than likely, it’s worth the effort.
References
Duke, Nell & Pearson, P.. (2002). Effective Practices for Developing Reading Comprehension. What research has to say about reading instruction. 3. 10.1598/0872071774.10.
Landmark College. (n.d.-a). Active reading (see also critical reading). Active Reading | Landmark College. https://www.landmark.edu/academics/writing-matters/wac-glossary/wac-active-reading
Lloyd, Z.T., Kim, D., Cox, J.T., Doepker, G.M. and Downey, S.E. (2022), “Using the annotating strategy to improve students’ academic achievement in social studies,” Journal of Research in Innovative Teaching & Learning, Vol. 15 No. 2, pp. 218-231.
Join our mailing list and get weekly tips, tools, and inspiration that will make your teaching more effective and fun. You’ll get access to our members-only library of free downloads, including 20 Ways to Cut Your Grading Time in Half, the e-booklet that has helped thousands of teachers save time on grading. Over 50,000 teachers have already joined—come on in.


This was a great read/listen. I have always taught annotation by talking with students about what they think is important to remember using titles, subtitles and headlines as a clue. However, this approach seems a better way to get kids to think more deeply about what they’re reading. Thank you for sharing these resources.
Glad you found it helpful, Elisa!
We’ve spent years building http://nb.mit.edu/ , a free-for-anyone *social annotation* site that lets students have discussions in the margins of any online course materials. It’s been used in thousands of classes and study groups at over 100 universities. Feel free to try it out.
Thanks for sharing this resource, Dr. Karger!